There are two ways of connecting using the TieLink Traversal Server:
1.Use the front panel of a codec to select a contact and dial without creating and saving a program.
2.Create a Program with TieLink configuration parameters specified.
TieLink Settings in Toolbox
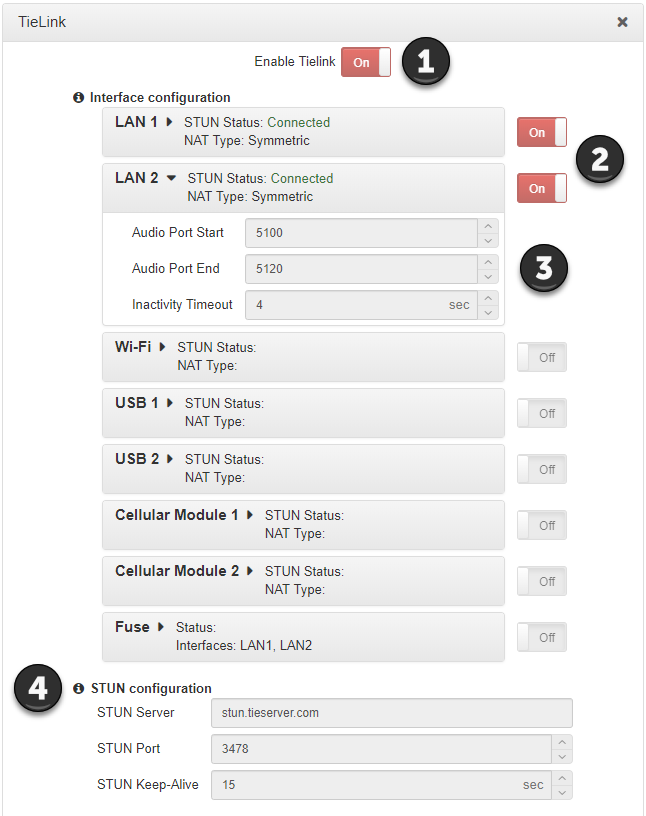
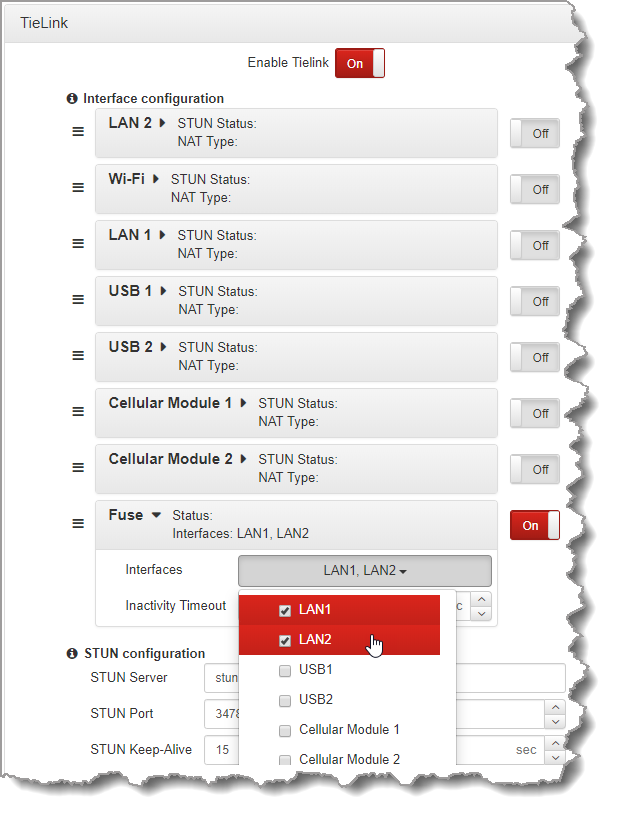
TieLink needs to be enabled in the codec before it can communicate with the TieLink Traversal Server. To facilitate connections the TieLink panel is used to configure interfaces and options like STUN. To view the panel open the HTML5 Toolbox Web-GUI and click Transport and then TieLink to open the TieLink panel.
1. Enable TieLink
Click Enable TieLink to enable TieLink connectivity.
2. Enable Interfaces
Click the ON/OFF button to enable each individual interface and/or select the interfaces used for Fuse-IP connections (Note: This is a simpler way to configure Fuse-IP. TieLink supports one connection to a single codec using Fuse-IP).
3. Adjust Tieline Interface Settings
Adjust TieLink interface ports, inactivity timeouts and Fuse-IP interface selections.
4. STUN Configuration
A STUN server is required to use TieLink. Adjust TieLink STUN configuration and use a different STUN server if required, e.g. to use a different port.
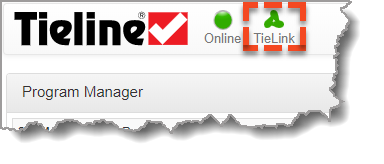
A green TieLink Symbol is displayed at the top of the Toolbox HTML5 Web-GUI when TieLink has been enabled successfully. Note: the symbol is orange if STUN is not successfully enabled on any interface.
|
Important Note: Ensure that the DNS Server settings are also configured because the codec must be able to resolve with Tieline’s various TieLink servers in order to be able to contact them. |

Reorder TieLink Interface Priority
When the codec attempts to connect to a TieLink contact, local interfaces are used in the order in which they are listed. For example, if both LAN1 and Wi-Fi are configured for use when dialing a contact, TieLink will attempt to use these interfaces in the order in which they are listed in the panel. It is possible to reorder local TieLink interface priority in the TieLink panel in Toolbox.
1.Click Edit in the TieLink panel.
2.Click the Drag Handle to the left of an interface to drag and reorder it.
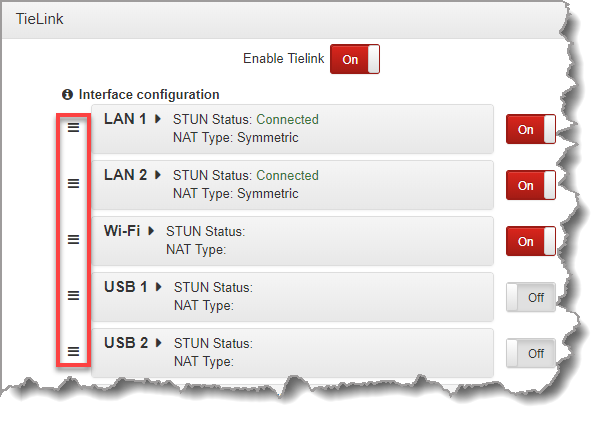
3.Click Save to save the new settings.
Configuring TieLink Connections in the Program Manager Panel
|
Important Note: The following settings can also be edited in the Connections panel. |

Include a Codec's Answering Audio Streams in TieLink Contact Lists
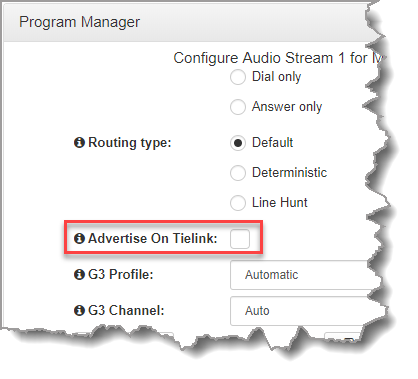
A default program will automatically display audio streams as ‘available’ in TieLink and allow answering of calls from codec 'followers' in a contact list. When creating custom programs, from an answering perspective the Program Manager panel is used to select which answering streams are "Stream Members" visible within a TieLink contact list. I.e if an answering stream is 'advertised' on TieLink then is becomes an available endpoint for other codecs to dial.
When creating a program select the Advertise On TieLink check-box to register answering audio streams in a loaded program with the TieLink Traversal server. These audio streams will be visible in TieLink contact lists which include this codec's audio streams. In other words, the answering audio streams will appear as available to dial (or "Busy" when connected) by other codec 'followers' in the same contact list.
Select a Contact to Dial using TieLink
From a dialing perspective, the Program Manager panel is used to select a contact to dial from within a TieLink contact list that has been shared with a codec. When creating a program:
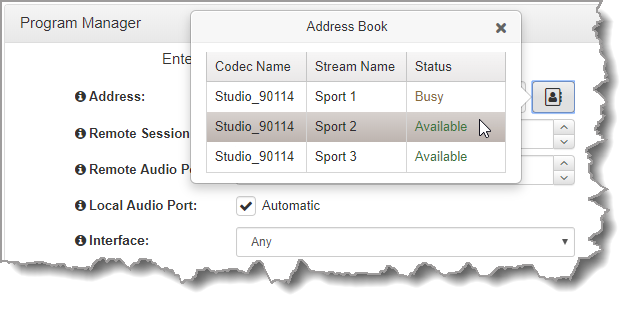
1.Click the Address Book ![]() button to select a contact to dial from the TieLink Address Book.
button to select a contact to dial from the TieLink Address Book.
2.Select the interface options to use on local and remote codecs when dialing TieLink connections.
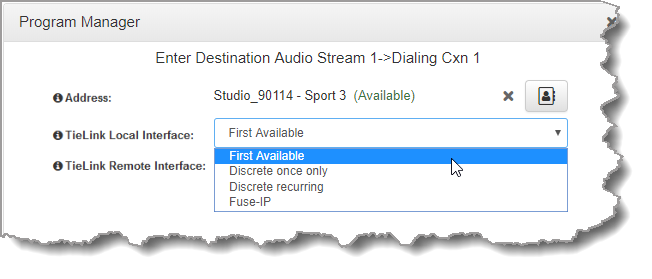
i.First Available: The first available interface that can successfully connect will be used to dial. If you dial two connections the same interface will be used for both connections, e.g. LAN1, even if another interface is available.
ii.Discrete once only: The first interface not being used by another connection will be used to dial. In the following example using two LAN interfaces, the codec connects a primary and redundant IP stream using different interfaces for each connection. A second redundant IP stream configured on each connection fails because both available interfaces are already being used for that connection.

iii.Discrete recurring: Uses the first interface that is not being used by another connection (within the same audio stream). After all interfaces have been used, each audio stream will scan each interface from the start again, in the order in which they are listed, and connect using the first available interface that will successfully dial and connect. The dialing order of the interfaces in the TieLink panel can be adjusted by clicking a dragging interfaces on the left side of the panel when it is in Edit mode.

iv.Fuse-IP: Connect using Fuse-IP data bonding. Multiple interfaces can be selected and bonded to aggregate data and create a higher bandwidth connection. This is configured in the TieLink panel as displayed in the following example. Please note that this is the simplest way to configure a Fuse-IP connection.
|
Important Note: Ensure an answering program is configured for Fuse-IP on the destination codec and locked. |
Updating TieLink Contacts
A TieLink administrator updates codecs included in, and excluded from, Contact Lists. Codec members of a Contact List shared with a codec are displayed from the Menu Bar by selecting Connect > Contact List to open the Contact List panel.
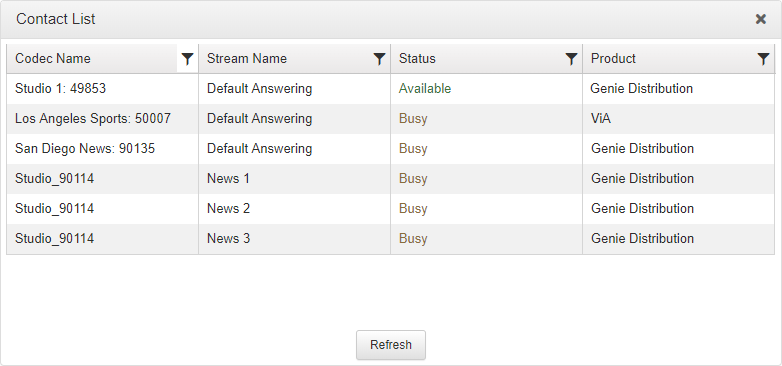
If a contact list is adjusted in TieLink it is necessary to click the Refresh button in the Contact List panel to display the latest contact info. This updates the Contact List panel, selectable contacts in Toolbox, and the codec screen when dialing and creating programs..
Stream Status in TieLink
The Contact List panel displays the availability of a TieLink audio stream. The status may display:
1.Available: The TieLink Traversal Server Network has provided reachable streaming interfaces and indicates the audio stream is not busy.
2.Busy: The codec is connected to the TieLink Traversal Server network and TieLink indicates the stream is busy.
3.Offline: The audio stream is unavailable within the TieLink Traversal Server Network. Possible reasons an audio stream may be offline include:
a.The codec is offline.
b.An audio stream is not advertised on TieLink.
c.TieLink and/or TieLink interfaces are disabled in the codec.
d.Ports are not open.
e.The Contact List panel in the Toolbox Web-GUI may need 'refreshing'.
f.DNS - Not resolving the STUN server set in the TieLink panel. Note: If a codec has a statically configured IP address, ensure that DNS Server settings are also configured.
g.DNS - Not resolving https://tieserver.com
h.The codec firmware version is not compatible.